Double spacing in Microsoft Word is a fundamental skill for anyone working with documents, whether it’s for academic papers, professional reports, or creative writing projects. However, mastering the nuances of double spacing can sometimes be a challenge. Fear not, as this comprehensive guide is here to walk you through everything you need to know about double spacing in Word.
Understanding Double Spacing
Double spacing refers to the practice of inserting an extra blank line between each line of text in a document. This formatting style is commonly used in academic writing, as well as in certain professional documents and manuscripts. It enhances readability by providing ample space between lines, making it easier for readers to follow along.
How to Double Space in Word

Microsoft Word offers several methods for double spacing your documents. Below are the step-by-step instructions for each method:
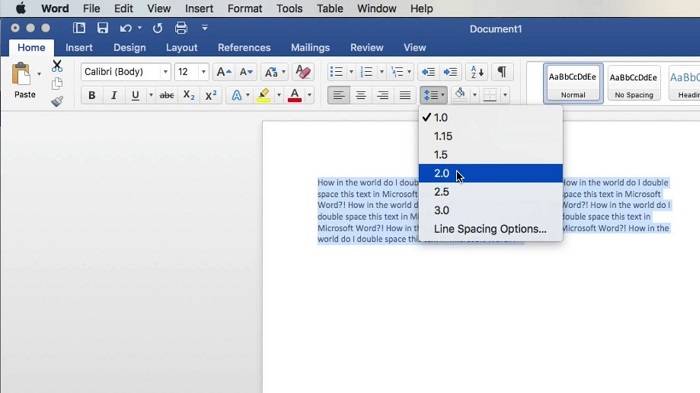
Using the Line Spacing Option
- Open your document in Microsoft Word.
- Select the text you want to double space. If you want to double space the entire document, you can skip this step.
- Go to the “Home” tab on the ribbon.
- Look for the “Paragraph” group.
- Click on the small arrow in the corner of the “Paragraph” group to open the Paragraph dialog box.
- In the Paragraph dialog box, locate the “Line spacing” drop-down menu.
- Click on the drop-down menu and select “Double.”
- Click “OK” to apply the double spacing to your selected text or the entire document.
Using Keyboard Shortcuts
- Open your document in Microsoft Word.
- Select the text you want to double space or place your cursor where you want to start double spacing.
- Press “Ctrl” + “2” on your keyboard.
- This keyboard shortcut will instantly double space the selected text or the entire document.
Creating a Custom Style

- Open your document in Microsoft Word.
- Select the text you want to format with double spacing.
- Go to the “Home” tab on the ribbon.
- In the “Styles” group, right-click on the style you want to modify (e.g., Normal).
- Select “Modify” from the drop-down menu.
- In the Modify Style dialog box, click on the “Format” button at the bottom left.
- Choose “Paragraph” from the drop-down menu.
- In the Paragraph dialog box, set the “Line spacing” to “Double.”
- Click “OK” to confirm the changes.
- Click “OK” again to close the Modify Style dialog box.
- Apply the modified style to your text by clicking on it.
Benefits of Double Spacing
- Enhanced Readability: Double spacing improves readability by providing adequate space between lines, reducing visual clutter, and making it easier for readers to follow along.
- Facilitates Editing: Double spacing allows ample space for handwritten annotations, comments, and edits, making it ideal for draft documents and collaborative editing.
- Adheres to Formatting Guidelines: Many academic institutions, publishers, and organizations require double spacing for submissions, manuscripts, and reports, ensuring compliance with formatting guidelines.
Tips for Effective Double Spacing
- Use Consistent Formatting: Maintain consistent double spacing throughout your document to ensure uniformity and readability.
- Proofread Carefully: Double spacing can sometimes make errors more noticeable, so be sure to proofread your document thoroughly before finalizing it.
- Adjust Spacing as Needed: Depending on your preferences or specific requirements, you may need to adjust the spacing to 1.5 lines or single spacing in certain sections of your document.
Mastering the art of double spacing in Word is a valuable skill for anyone who regularly works with documents. Whether you’re writing an academic paper, crafting a professional report, or drafting a manuscript, knowing how to double space effectively can enhance readability and streamline the editing process. By following the step-by-step instructions and tips outlined in this guide, you’ll be well-equipped to double space your documents with ease and precision.


